


 What is an esophagostomy tube?
(Download as a PDF.)
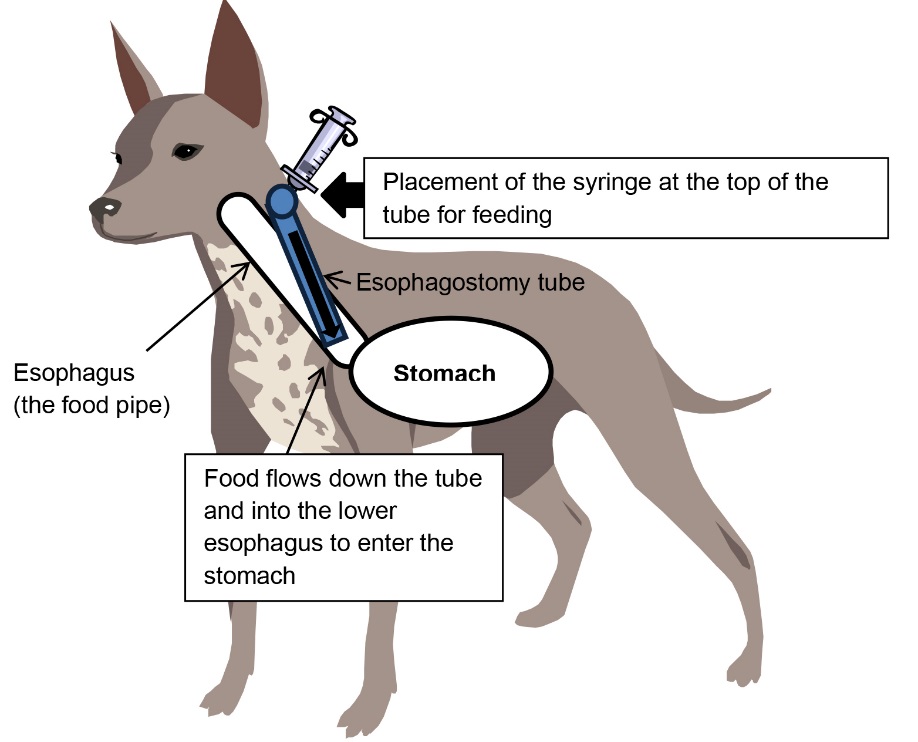
Your pet has had a type of feeding tube called an esophagostomy tube (E-tube) placed. This tube enters the esophagus (the food pipe) from a surgical incision on the left side of the neck. It allows your pet to be fed until its appetite or ability to eat has returned, and it also makes giving oral medications much simpler. Having the tube in place will not prevent your pet from eating and drinking on its own if it wishes to do so. In fact, eating by mouth is usually encouraged! Once your pet can get all necessary food and medicine by mouth, the tube can be removed.
The tube does not enter the stomach; rather, it begins and ends in the esophagus. Food must enter the tube slowly so that it can be passed into the stomach slowly. Although these tubes can be life-saving, feeding via tube and care of the tube require a dedicated pet owner.
Why does an animal need an E-tube?
There are a variety of reasons a pet may need an E-tube, but usually it is because the pet cannot or will not take in enough calories to meet nutrition requirements. The tube also offers an easy way to administer many medications. Your pet can go home with an E-tube in place and does not need to stay in the hospital. You can feed a variety of diets by way of the tube, but they must be in the form of a slurry.
What are the complications associated with E-tubes?
Any medical procedure can result in unexpected complications. The procedure requires general anesthesia, which in itself can occasionally lead to minor or serious complications. By the time your pet goes home, any danger from anesthesia is in the past.
The site where the tube enters through the skin and into the esophagus can become infected, so it is important to keep it clean. If it becomes red, is warm to the touch or has an abnormal discharge (e.g., pus), or if your pet acts in pain when you touch the site, contact a veterinarian.
Another concern is that your pet might displace the tube, either by pulling it out or vomiting the tube out of the esophagus and into their mouth. If the tube does become displaced, contact a veterinarian immediately as it can often be replaced if you act quickly.
The last common complication is that the tube can become clogged with food. We describe how to deal with this in the Monitoring and Tube Care section, but if you cannot resolve the clog yourself, see your veterinarian.
Diet Information
Until your pet’s appetite returns, you will need to feed enough to meet the minimum daily energy requirement, which has been calculated for you. In an ideal world, you would divide the feedings into four per day. If this is not possible, please let us know, and we will develop another feeding schedule. Although the feedings should be spaced out, they do not have to be given exactly six hours apart. Feeding at breakfast, lunch, dinner and bedtime is appropriate. Refer to the information below for feeding instructions and tube care.
Your pet’s diet: ______________________________
Amount of food needed for daily caloric needs: _____________________can(s)
To mix your pet’s food appropriately, add _________________ can(s) into a blender and add _______mL of tap water and blend. Please store this in the fridge.
Administer _____mL approximately every __ hours on Day 1.
Administer _____mL approximately every __ hours on Day 2.
Administer _____mL approximately every __ hours on Day 3.
Administer _____mL approximately every __ hours on Day 4 and thereafter.
As your pet begins to eat more food by mouth, you can decrease the amount you feed through the tube either by cutting out a feeding or feeding less at each meal.
Feeding Instructions
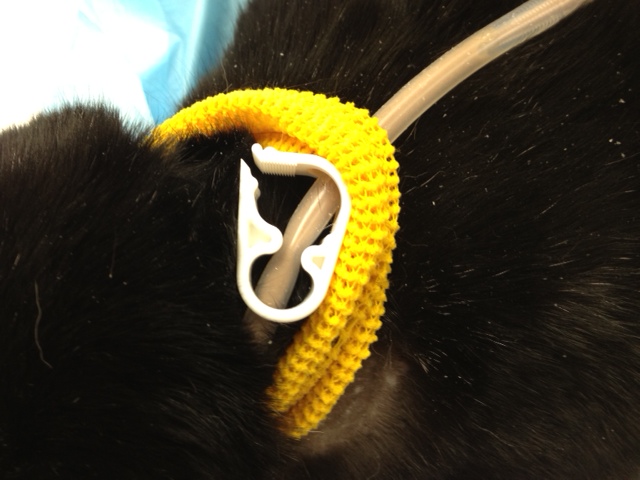
Step 1: Check that the tube is in place. Remove the end of the tube from the neck wrap. Before each feeding, attach an empty syringe (10 cc) to the external feeding port and pull back on the plunger. If the tube is in place, the plunger should move back to its starting position on its own (negative pressure), and you may proceed to step 2. If the plunger does NOT move back to its starting position, DO NOT PROCEED WITH FEEDING. The E-tube may be displaced, and you should call a veterinarian for further instructions.
Step 2: Flush the tube with water. Give 10 mL of lukewarm water through the E-tube. If there is no cough, gag, retch or discomfort, prepare an extra syringe with lukewarm water to use for flushing the tube when the feeding is complete. If coughing or gagging DOES occur, DO NOT PROCEED WITH FEEDING. The tube may be displaced, and your pet needs to be brought to a veterinarian to check the placement of the E-tube.
Step 3: Warm the blended diet. Keep opened containers of the blended diet refrigerated between feedings. Before each feeding, slightly warm the expected feeding volume (see above under diet information for amount) to room temperature. The best way to warm the food is to fill the syringes with the amount of food to be fed and place them in a container of warm water or run under warm water. Due to the risk of overheating, we do NOT recommend using the microwave. If you do use the microwave, warm the food in a bowl and mix well before pulling it into a syringe. You can test the temperature on your wrist like checking the temperature of a baby bottle. The food should be room temperature to lukewarm, not hot or cold.
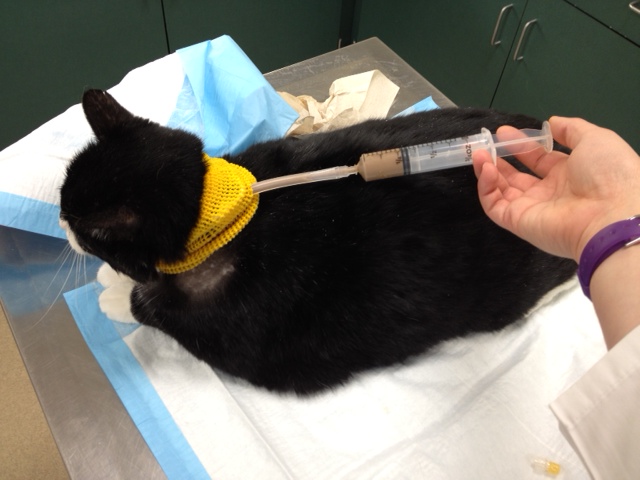
Step 4: Feeding. Attach the syringe to the feeding port. This will require you to remove the cap on the port, but keep the cap in easy reach. Once the syringe is attached, you will likely need to flip the tube clamp to the open position. After that is done, you can begin slowly pushing the plunger on the syringe to administer the food. It is important to feed the liquid diet slowly (i.e., each meal over 20 minutes) since the food is not going directly into the stomach but instead into the esophagus. If the pet begins to act nauseated during the feeding, it is time to stop or at least slow down dramatically. If they become too full, your pet will likely throw up! If you determine that the volume of food you are to give at each feeding consistently makes your pet nauseated, please call your veterinarian to discuss modifying the feeding schedule.
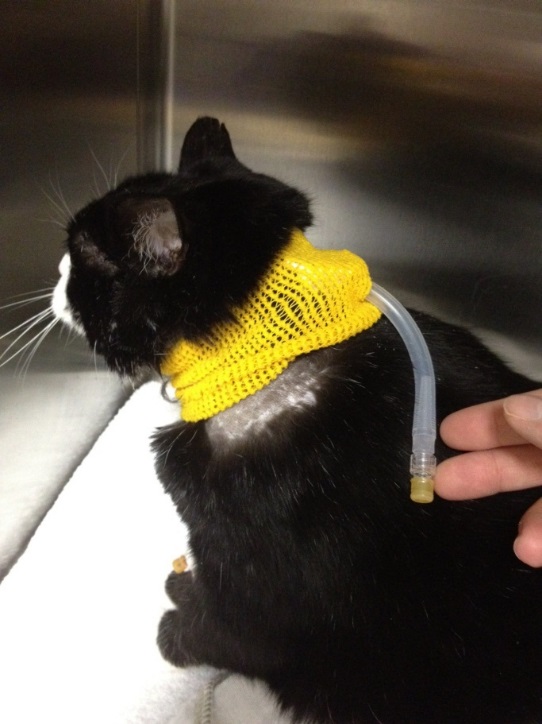
Step 5: Finishing. Once the food syringe is emptied, re-close the clamp on the tube. Now, detach the food syringe and attach the extra syringe of water. Again open the clamp, and flush the E-tube with 10 mL of water. You can give the water a bit faster than you did the food. Once you are done, close the clamp, remove the syringe, and re-attach the cap on the end of the tube. Tuck the tube back into the neck wrap so that your pet can’t easily pull the tube out. Rinse out the syringes so that they are ready for next time, and you are done until the next meal.
Monitoring and Tube Care
ENTRANCE SITE CARE: The site where the tube enters the skin of the neck should be examined daily for discharge, swelling, redness or foul odor. A small amount of swelling and discharge may be normal; this can be gently cleaned by blotting (not rubbing) with a clean, warm, moist towel, gauze or paper towel. If the discharge is yellow or green and malodorous, or there is increased swelling, redness or pain, see your veterinarian.
TUBE CLOGGING: In the event that the E-tube clogs, use cola to unclog the tube. Infuse about 5 mL of cola into the tube and let it sit for 10 minutes, then flush the tube with water according to the feeding instructions above. If you are unsuccessful at unclogging the tube in three successive attempts, consult a veterinarian.
Oral Feeding
If E-tube feeding is well tolerated after four to five days, begin to offer small amounts of food prior to each tube feeding in order to monitor for return of appetite. As oral feeding increases, the volume or frequency of tube feeding can be decreased accordingly. It is helpful if you can keep track of your pet’s weight at least every week while you are transitioning from tube feedings to feedings by mouth. When your pet is meeting the full minimum daily energy requirement orally, see your veterinarian about E-tube removal.

Placing of the E-tube under general anes-thesia. The tube enters a small incision in the neck.
Final appearance after E-tube placement.
Feeding through the E-tube with a slurry diet.
Feeding through the E-tube with a slurry diet.
